
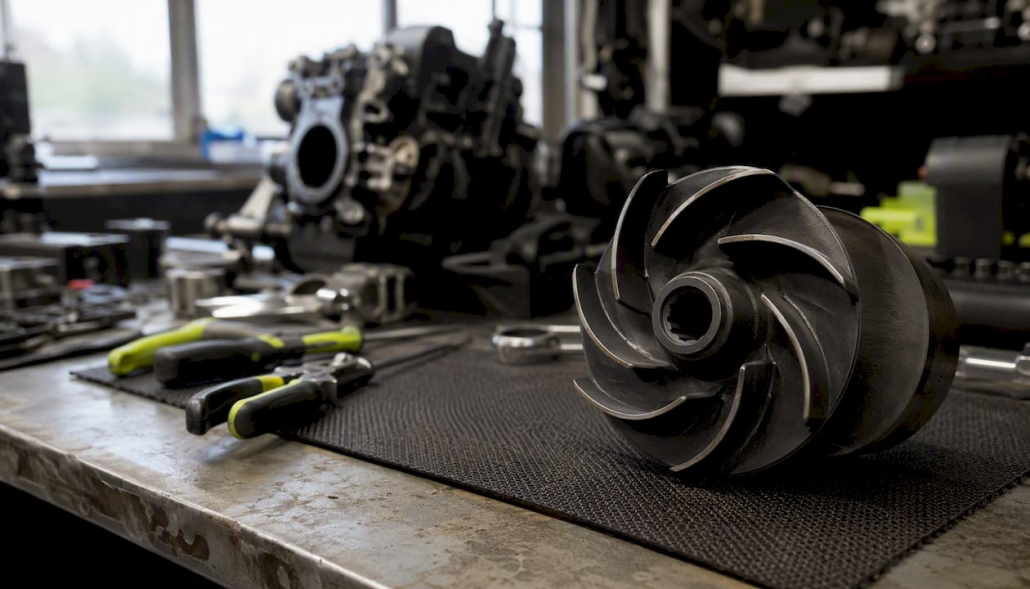
PWC Impeller Diameter: Why Prop Size Drives Performance
Impeller diameter is the single most direct control you have over how your PWC’s jet pump loads the engine. A larger diameter moves more water per revolution, increasing pump resistance and pulling the engine down in RPM. A smaller diameter reduces that load, letting the engine spin higher. The practical rule: measure your wide-open-throttle RPM under normal riding load, then choose an impeller diameter that puts peak WOT RPM inside your engine’s optimal powerband. Get that match right and you gain usable acceleration, midrange pull, and top speed. Get it wrong and you leave power on the table, or worse, bog the engine entirely.
Three core trade-offs every rider should understand before touching the pump:
- Acceleration and holeshot: A smaller diameter (lower load) lets the engine rev freely off the line, producing snappier launch.
- Midrange hook-up: A well-matched diameter keeps the engine in its torque peak through the mid-range, where most riding and racing happens.
- Top speed: A larger diameter can raise theoretical top speed by moving more water per revolution, if the engine can sustain the load.
Pro Tip: The OEM impeller is tuned for a stock engine. Once you add intake, exhaust, or ECU mods, the powerband shifts and the stock diameter may no longer be the right load for your engine.
Key Takeaways
Impeller diameter controls engine load and WOT RPM, making it the most direct tuning lever between your engine’s powerband and real-world thrust.
| Point | Details |
|---|---|
| Diameter sets engine load | Larger diameter increases pump resistance, pulling WOT RPM down; smaller diameter reduces load and raises RPM. |
| Match diameter to powerband | Measure WOT RPM under normal load and select a diameter that keeps the engine at its power peak. |
| Pitch and blade count interact | A 13–19° pitch range and blade count (3 vs. 5 blades) change acceleration and top-speed behavior alongside diameter. |
| Test one variable at a time | Swap only the impeller, run identical passes, and log RPM and speed before making a second change. |
| IPD Racing model lookup | Use IPD Racing’s Shop by Model to confirm diameter and pitch options for your specific hull and engine build. |
Table of Contents
- Why PWC Prop Diameter Matters for Thrust and RPM
- Diameter alone doesn’t tell the whole story
- How to choose the right impeller diameter for your ski
- How to measure impeller diameter and confirm fitment
- Symptoms that your impeller setup is wrong
- How to test impeller changes safely and log useful data
- IPD Racing impeller kits and how to get the right fit
- Installation notes, fitment pitfalls, and safety cautions
- What ride testing actually teaches you about diameter
- A note from Casey
- IPD Racing has the impeller kit for your build
- Sources
Why PWC Prop Diameter Matters for Thrust and RPM
Diameter determines how much water the impeller displaces per revolution. More displacement per revolution means more pump resistance, which the engine must overcome. Think of the impeller as a load device: it dictates where the engine operates in its powerband, not just how fast the ski goes. An impeller that is too large for a given engine will pull WOT RPM below the power peak, reducing real-world thrust even though the pump is physically moving more water.
Diameter also interacts directly with nozzle exit velocity. A smaller nozzle raises exit velocity and helps top speed; a larger nozzle broadens midrange thrust. Changing diameter without considering nozzle size can produce unexpected results.
The relationship in plain terms:
- Larger diameter → higher water displacement per rev → greater pump load → lower WOT RPM → more low-end thrust potential, but risk of lugging
- Smaller diameter → lower displacement per rev → reduced pump load → higher WOT RPM → snappier acceleration, lower peak thrust
| Pitch Range | Typical Application | Expected Effect |
|---|---|---|
| 13° (low pitch) | Recreation, holeshot, technical riding | Strong low-end punch, lower top speed |
| 19° (high pitch) | Top-speed runs, open-water racing | Higher theoretical top speed, reduced hole shot |
| +1° increment | Any tuning step | Meaningful shift in top speed and usable RPM feel |
Small pitch increments of ±1° can produce measurable real-world speed and feel changes, which is why aftermarket vendors offer pitch options in tight steps rather than large jumps.
Diameter alone doesn’t tell the whole story
Diameter is critical, but pitch, blade count, clearance, and material interact with it just as much. Treating diameter as the only variable leads to mismatched setups.
Key interacting variables:
- Pitch (leading/trailing edge angles): Controls intake aggressiveness and expulsion efficiency. Pitch notation like “13/19” means the leading edge is 13° and the trailing edge is 19°; the first number drives low-end thrust, the second drives top-speed flow.
- Blade count: Three-blade impellers spool faster and deliver snappier acceleration. Five-blade designs increase static thrust and top-end stability at some cost to initial spool.
- Housing clearance: The gap between the impeller’s outer diameter and the pump housing directly affects efficiency. Too much clearance and water recirculates instead of being expelled.
- Blade geometry and metallurgy: Blade shape affects cavitation resistance. Stainless steel holds geometry under load better than aluminum, especially in race conditions.
- Wear: A worn impeller loses effective diameter and pitch, reducing performance even when specs look correct on paper.
Pro Tip: A +1° pitch change or a 1–2 mm diameter difference can shift your usable RPM band noticeably. Always make one change at a time so you can isolate what produced the result.
Modern OEM impellers are well-optimized for stock machines. Aftermarket changes do not guarantee improvement unless the impeller is matched to your specific engine modifications and riding use-case.
How to choose the right impeller diameter for your ski
The core framework: measure current WOT RPM under normal load, define the target RPM for your goals, then pick the smallest incremental diameter or pitch change that moves you toward that target.
- Verify baseline WOT RPM. Run the ski at full throttle under your typical load (your weight, fuel level, gear) and log peak RPM. This is your starting point.
- Note all engine modifications. Intake, exhaust, ECU/fuel tune, and porting all shift the powerband. A modded engine needs a different impeller load than a stock one.
- Define your target WOT RPM band. Stock engines typically have a published peak-power RPM. Tuned engines may peak higher. Know your number before selecting an impeller.
- Select an incremental change. If WOT RPM is below target, reduce load (smaller diameter or lower pitch). If WOT RPM is above target, increase load (larger diameter or higher pitch). Start with the smallest available step.
- Plan staged tests. Swap one variable, run the same course under the same conditions, log RPM and feel, then decide whether to go further.
For holeshot and technical riding, prioritize a diameter that keeps WOT RPM at or slightly above the engine’s torque peak. For top-speed runs, a slightly larger diameter that keeps WOT RPM just at the power peak tends to produce the best results.
When to repitch vs. buy new: repitching an existing impeller makes sense for small adjustments on a blade in good condition. If the impeller shows wear, cavitation damage, or you need a significant diameter change, a new kit is the cleaner path.
How to measure impeller diameter and confirm fitment
Measure outer diameter and housing clearance first, then confirm hub compatibility before ordering any kit.
- Outer diameter: Remove the impeller and measure across the blade tips with calipers. Measure at multiple points to catch any wear-induced asymmetry.
- Housing clearance: Reinstall the impeller and measure the gap between blade tip and pump housing wall. Tight clearance improves efficiency; excessive clearance allows recirculation.
- Hub interface: Check the drive shaft spline count and diameter. A hub mismatch prevents installation entirely.
- Part number interpretation: The pitch notation (e.g., “13/19”) tells you leading-edge and trailing-edge angles. Diameter is typically listed separately in millimeters or as a nominal size in the part description.
Extreme repitching can reduce outer diameter and create excessive clearance with the housing. Professional shops may need to weld or correct fitment after aggressive modifications, so confirm clearance after any significant pitch change.
Symptoms that your impeller setup is wrong
These symptoms point at an impeller-to-engine load mismatch, not necessarily an engine fault.
- WOT RPM consistently lower than the published peak-power range
- Heavy, sluggish acceleration that feels like the engine is lugging
- Increased cavitation in choppy water or after aerial landings
- Top speed that plateaus well below expected figures
- RPM recovery after chop is slow or inconsistent
Immediate steps if you notice these symptoms:
- Revert to the stock impeller if available and re-run the same course to isolate the impeller as the cause.
- Record WOT RPM under a known, consistent load.
- Inspect the impeller for blade wear, tip damage, and clearance changes.
- Use IPD Racing’s model lookup to cross-reference your ski’s model and current mods against available diameter and pitch options.
How to test impeller changes safely and log useful data
Test incrementally with consistent conditions and log one variable at a time. That discipline is what separates a tuner from a guesser, and it is the foundation of methodical PWC tuning.
Testing sequence:
- Run three baseline passes at WOT under identical conditions (same fuel level, same rider weight, same course). Log peak RPM and top speed for each.
- Swap the impeller. Change nothing else.
- Run the same three passes under the same conditions.
- Compare peak WOT RPM, holeshot feel, top speed, and RPM recovery after chop.
- Decide: go further in the same direction, reverse, or hold.
Data points to record on every run:
- Peak WOT RPM
- 0–30 mph time or 0–60 foot time as a holeshot proxy
- Peak top speed (GPS-verified)
- RPM recovery time after aerial or chop impact
- Any cavitation events
Pro Tip: A smartphone tachometer app paired with a GPS speed logger gives you a repeatable, low-cost data set. Keep a simple log sheet with date, conditions, impeller spec, and run results so you can compare across sessions.
Control variables that affect results: wind direction and speed, rider weight and gear, fuel load, water temperature, and course length. Run with the same passenger count every time.
IPD Racing impeller kits and how to get the right fit
IPD Racing offers model-specific impeller kits covering Yamaha, Sea-Doo, Kawasaki, and other brands, with pitch and diameter options matched to both stock and modified engines. The product range includes Impros and Solas impellers, with fitment guidance built into the selection process.
- Kits are available in multiple pitch steps so you can target a specific RPM band without guessing.
- Model lookup at Shop by Model narrows options to parts confirmed for your hull and pump.
- Have your WOT RPM baseline, engine mod list, and riding goal ready before contacting support.
Pro Tip: If you are unsure whether to go up or down in pitch, share your baseline WOT RPM and mod list with IPD Racing’s team. That single data point eliminates most of the guesswork.
For Solas impeller options and additional performance parts, the IPD shop carries a broad selection across skill levels and use cases.
Installation notes, fitment pitfalls, and safety cautions
Improper diameter or pitch choices increase drive-line stress and can void some manufacturer warranties if installation is incorrect.
Installation checklist:
- Verify torque specs for the impeller nut against your model’s service manual.
- Confirm hub spline engagement before final torque.
- Check blade-tip-to-housing clearance after installation, not just before.
- Inspect the drive shaft and pump bearings for wear before installing a higher-load impeller.
- Run a short, controlled test pass before a full WOT run to confirm no vibration or unusual noise.
Safety and warranty cautions:
- Avoid sustained operation at RPM well below the engine’s designed range. Lugging a two-stroke or supercharged four-stroke accelerates wear.
- Check your OEM warranty terms before installing any aftermarket impeller. Some manufacturers restrict coverage for pump modifications.
- When in doubt about clearance or hub fit, have a qualified PWC shop verify the installation before water testing.
Aggressive pitch changes that reduce outer diameter can create clearance problems requiring corrective work. Confirm clearance measurements after any significant modification.
What ride testing actually teaches you about diameter
A note from Casey
Most riders focus on pitch numbers and ignore diameter until something feels wrong. The real lesson from on-water testing is that diameter and pitch work together, and a small diameter change on a modded engine can produce a bigger RPM shift than a full pitch step on a stock one. When a ski with an intake and exhaust upgrade still feels sluggish off the line, the impeller is almost always the missing piece, not more engine work.
If you are unsure where to start, bring your WOT RPM log and your mod list to IPD Racing. The model lookup gets you to the right diameter and pitch options fast, without trial-and-error swaps.
IPD Racing has the impeller kit for your build
Matching impeller diameter to your engine’s actual powerband is the fastest path to real performance gains, and IPD Racing makes that match straightforward. The IPD shop carries impeller kits for Sea-Doo, Yamaha, Kawasaki, and more, with pitch and diameter options for stock builds, lightly modified skis, and full race setups. Every kit comes with fitment guidance tied to your specific model.
For riders who have already upgraded intake, exhaust, or ECU tuning, IPD Racing’s performance parts catalog includes complementary components to complete the build. Use the model lookup, confirm your WOT RPM baseline, and get the right impeller on the water.
Sources
- Is Your Aftermarket Impeller Slowing You Down – The Watercraft Journal | the best resource for JetSki, WaveRunner, and SeaDoo enthusiasts and most popular Personal WaterCraft site in the world!
- How PWC Impellers Work — And Why They’re More Important Than You Think
- Understanding Jet Ski Impeller Pitch Numbers To Choose The Right Impeller » Evolution Jetsports

