

PWC Sub-Pole Modification Steps: A Racer’s Install Guide
Yes, you can install an aftermarket sub-pole or tow-pylon on most PWCs. The PWC subpole modification steps follow a clear sequence: verify competition rules and hull compatibility, gather marine-grade tools and hardware, reinforce the mounting area with internal backing plates and epoxy, install the bracket and pole, torque all fasteners to spec, then run land and water tests. Most experienced racer mechanics complete the job within a few hours. First-time installers should budget sufficient time for prep and testing.
High-level steps at a glance:
- Confirm IJSBA or event rules and check hull warranty implications
- Gather tools, 316 stainless fasteners, backing plates, marine sealant, and a torque wrench
- Remove factory components and inspect the mounting area for cracks
- Dry-fit the bracket, drill with care, and install internal backing with waterproof epoxy
- Install the sub-pole, torque in sequence, and route cables clear of moving parts
- Run a pull test on land, then progressive load tests on water
- Re-torque after the first ride, at one day, one week, and monthly through the season
Pro Tip: Confirm your kit fits your exact model and year before ordering. A bracket designed for a Yamaha SuperJet will not align correctly on a Sea-Doo Spark without modification.
Key Takeaways
A properly reinforced sub-pole mount requires internal backing plates, waterproof epoxy, 316 stainless fasteners, and a documented re-torque schedule to stay solid through a full race season.
| Point | Details |
|---|---|
| Rules and compatibility first | Confirm IJSBA rules and hull fitment before purchasing any kit or drilling anything. |
| Internal backing is mandatory | Backing plates and epoxy-bonded braces prevent fastener shear and crack propagation under tow loads. |
| Torque sequence matters | Use a cross-pattern torque sequence and a calibrated torque wrench; never estimate by feel on fiberglass. |
| Re-torque after the first ride | Fasteners in composite hulls relax after initial load; the first post-ride check is the most critical. |
| IPD Racing kits and support | IPD Racing stocks matched sub-pole kits, hardware, and installation guides for Sea-Doo, Yamaha, and Kawasaki platforms. |
Table of Contents
- What safety and competition rules apply before you modify a sub-pole?
- What tools, fasteners, and kit parts do you need?
- How do you prep the craft and remove factory components?
- How do you align and reinforce the mounting bracket?
- How do you attach the sub-pole hardware step by step?
- How do you test the install on land and on water?
- How do you fix looseness, noise, corrosion, and hull stress signs?
- How long does the job take and what does it cost?
- What IPD Racing products and support are available?
- What one installation lesson actually matters most
- IPD Racing has the parts and guidance to get this done right
- Sources
What safety and competition rules apply before you modify a sub-pole?
Rules come first. IJSBA freestyle rules state that handle poles and mounting brackets may be modified or replaced, but they must function as originally designed. No part of the hull or handle pole may be tethered to a competitor. Violating the tethering rule is a disqualification risk and a serious safety hazard.
For non-freestyle racing classes, check your specific event rulebook. Different formats treat pole modifications differently; the types of PWC racing competitions guide covers how organizers handle aftermarket hardware across formats.
Before drilling or reinforcing anything, verify:
- Your event’s current rulebook permits the modification
- Your hull manufacturer’s warranty position on drilling or adding tow attachments
- Your watercraft insurance policy covers modified tow points
- The load path for tow forces runs into structural hull material, not thin gelcoat
- Cable routing keeps all lines away from the rider’s body and moving parts
- No tether connection links the pole to a rider or competitor
Pro Tip: The Sea-Doo Spark has no factory ski pylon and a lightweight hull. Drilling it without proper backing plates voids the warranty and risks hull delamination under tow loads.
What tools, fasteners, and kit parts do you need?
A complete sub-pole installation requires specific hardware. Using undersized or non-marine fasteners is the leading cause of bracket failures in salt and brackish water.
| Item | Specification |
|---|---|
| Drill with reverse capability | Variable speed; reverse mode scores gelcoat before cutting |
| Step bit for fiberglass | Prevents spidering; use with reverse-first technique |
| Torque wrench | Calibrated in ft-lbs; mandatory for final fastener torque |
| Ratchet set | Metric and SAE; 3/8" and 1/2" drive |
| Marine sealant | 3M 4200 or equivalent; for sealing drilled holes |
| Waterproof epoxy | Two-part structural; bonds internal braces to pole wall |
| 316 stainless fasteners | Grade 316, not 304; superior corrosion resistance in saltwater |
| Backing plates | 1/4" aluminum or stainless; sized to spread load across hull skin |
| Nylock or all-metal lock nuts | Prevents vibration-induced loosening |
| Anti-seize compound | Applied to all stainless threads before assembly |
Stainless pole crowns made from 304 series stainless and TIG-welded construction were developed specifically to address thread failures, cracking, and corrosion in original OEM crowns. For any crown or bracket exposed to saltwater, 316 stainless is the better choice.
Compatibility check: confirm the kit lists your exact hull model, year, and whether it requires drilling or clamps to an existing tow eye. Some older models need trimmed threaded rod ends or modified cable mounts to fit aftermarket poles correctly.
How do you prep the craft and remove factory components?
Preparation prevents damage to the hull and makes the install go cleanly.
- Secure the craft on a trailer or padded stands with the hull level and stable.
- Disconnect the battery or pull the ignition kill lanyard to prevent accidental starts.
- Remove the seat and any access panels that expose the handle pole base and mounting area.
- Photograph cable routing, fastener positions, and the existing tow eye before touching anything.
- Loosen factory hardware in reverse torque order; support the pole by hand to avoid stress on the crown.
- Lift the pole clear and set it aside. Inspect the mounting area for gelcoat spidering, cracks, or soft spots in the fiberglass.
- Clean all mating surfaces with isopropyl alcohol. Any grease or residue will prevent epoxy from bonding correctly.
If the factory mounting area shows existing cracks or delamination, stop and assess whether the hull needs repair before proceeding. Installing a sub-pole over a compromised mounting zone concentrates tow loads directly into the damaged area.
How do you align and reinforce the mounting bracket?
Bracket alignment determines how tow forces distribute into the hull. A misaligned bracket creates point loads that crack fiberglass over time.
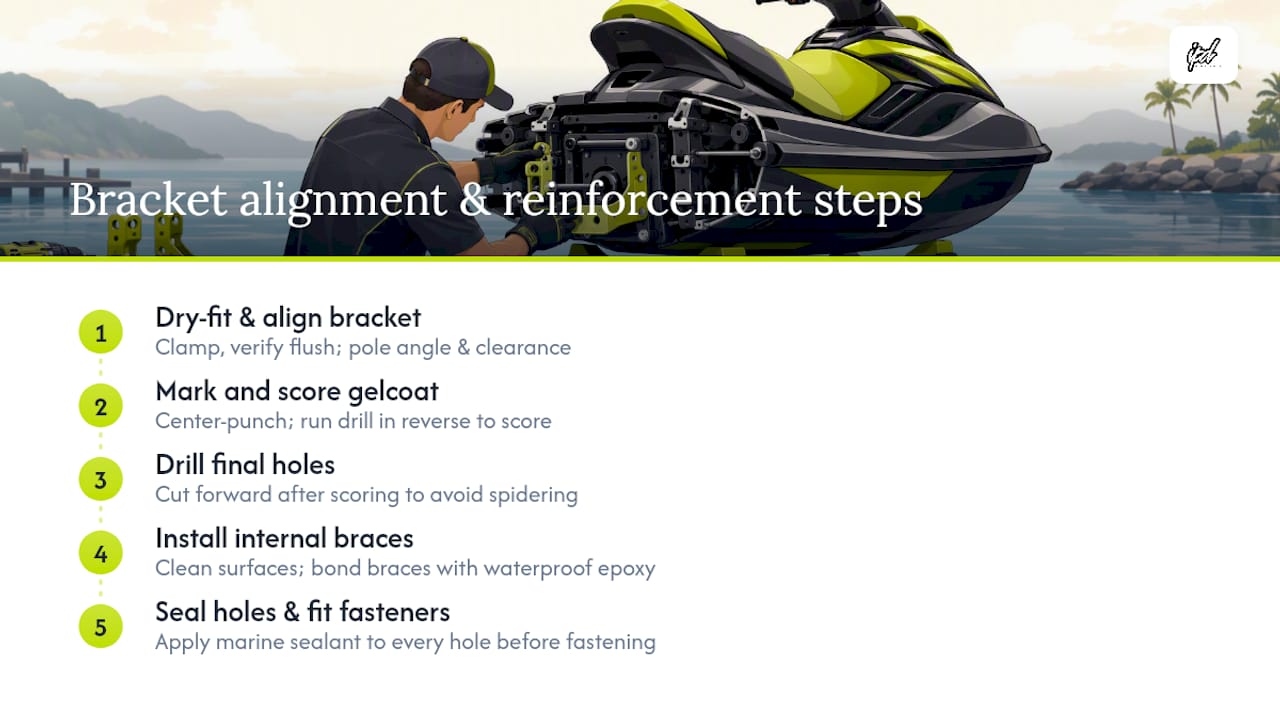
Dry-fit the bracket first. Clamp it in position and verify it sits flush against the hull contour with no rocking. Check that the pole angle matches the intended tow direction and that there is clearance for the trim system and rear platform.
Once alignment is confirmed, mark drill locations with a center punch. Run the drill in reverse to score the gelcoat before cutting forward. This technique, documented by Sea-Doo Forum installers, prevents the gelcoat from spidering outward as the bit enters.
The patented reinforcement method uses internal braces bonded with waterproof epoxy to the inner pole wall, combined with external clamping members and stainless hardware. The epoxy cushions the brace, prevents vibration-induced crack propagation, and locks the brace in position permanently. Clean all internal surfaces before applying epoxy; any contamination breaks the bond.
Pro Tip: Apply marine sealant to every drilled hole before inserting fasteners. Unsealed holes allow water intrusion into the fiberglass core, which causes delamination over a single season.
How do you attach the sub-pole hardware step by step?
This is the sequence that produces a solid, rattle-free install.
- Slide the pole into the bracket and install the main mounting bolt finger-tight only.
- Insert internal braces into the pole cavity and apply two-part epoxy between each brace and the inner wall. Allow full cure time per the epoxy manufacturer’s spec before applying load.
- Install secondary fasteners through the bracket and backing plate, again finger-tight.
- Torque clamp screws in a cross pattern to distribute compression evenly around the bracket. Follow the kit’s specified torque value; do not estimate.
- Final-torque the main mounting bolt to the kit or OEM spec. Never overtighten into fiberglass without a backing plate behind it.
- Route all cables and safety lines away from moving parts and secure with marine-grade zip ties or cable clamps.
- Apply anti-seize compound to all exposed stainless threads. Use a marine-rated threadlocker on fasteners that are not designed for removal during routine maintenance.
Pro Tip: If the cable length is slightly short after routing, trim the threaded rod end rather than forcing the cable into a tight bend. A kinked cable fails under load.
The IPD Racing handpole install guide includes photos and torque sequences that match this approach and serve as a direct reference for each step.
How do you test the install on land and on water?
Testing confirms the install is structurally sound before any real load hits it.

Land tests: Attach a strap to the sub-pole and pull firmly against a fixed anchor or winch. Check for any movement at the bracket base, sealant squeeze-out from drilled holes, or resin delamination around fasteners. Wiggle the pole in all directions and listen for any creak or click that signals loose hardware.
On-water tests: Start with low-speed passes to check alignment and listen for new noises. Progressively increase load with a spotter watching the hull for flex, water intrusion at the bracket, or any change in handling. Stop immediately if you hear cracking or see water weeping from the mount.
Re-torque schedule: Check all fasteners after the first ride, again at one day, at one week, and then monthly through the season. Log torque values and any observed movement in a maintenance record. IPD Racing’s tuning best practices document this inspection schedule as standard procedure for professional installs.
Pro Tip: Fasteners in fiberglass composites relax after initial load cycles. The first re-torque after ride one is the most critical check in the entire schedule.
How do you fix looseness, noise, corrosion, and hull stress signs?
Most post-install problems fall into three categories:
- Loose mounting: Determine whether the fastener sheared or the backing plate failed. If the fastener is intact but the bracket moves, the backing plate is undersized. Replace it with a larger plate and re-bed with epoxy.
- Noise and vibration: Verify the epoxy bond between the internal brace and pole wall is solid. A hollow knock means the brace has separated. Re-drill, clean, re-epoxy, and allow full cure. Add rubber isolation washers between the bracket and hull skin to reduce harmonic vibration.
- Corrosion: Remove all affected hardware immediately. Replace with 316 stainless fasteners, clean mating surfaces with a wire brush and isopropyl alcohol, and apply anti-seize before reassembly. Inspect the surrounding gelcoat for spidering, which indicates stress concentration at the fastener hole.
Hull stress signs (white stress marks radiating from fastener holes, soft spots when pressed) require professional assessment before the craft returns to the water.
How long does the job take and what does it cost?
DIY install time runs a few hours for an experienced racer mechanic and longer for a first-time installer including prep and testing. Pay for professional installation when the hull requires bonded reinforcements, when you lack confidence drilling fiberglass, or when the mounting area shows pre-existing damage. A failed DIY install on a complex hull can cost more in fiberglass repair than the original shop labor would have.
What IPD Racing products and support are available?
IPD Racing stocks sub-pole kits, mounting brackets, backing plates, and corrosion-resistant hardware for Sea-Doo, Yamaha, Kawasaki, and other major PWC platforms. The ProWatercraft handling parts category covers pole-related components and replacement hardware for freestyle and race applications.
Available resources:
- Step-by-step installation guides with photos and torque sequences on product pages
- PWC Doctor technical support knowledgebase for troubleshooting common install issues
- Direct tech support via phone and contact form for model-specific fitment questions
- Watercraft Werks freestyle and handling parts for riders needing proven freestyle-specific pole hardware
Pro Tip: Before ordering, use the product page fitment filter to confirm the kit matches your hull model and year. IPD Racing’s tech team can confirm compatibility for older or less common models.
What one installation lesson actually matters most
The single most common mistake in a DIY sub-pole install is skipping the epoxy bedding on internal braces. Installers who bolt the bracket down without bonding the internal brace to the pole wall end up with a mount that feels solid on day one and develops a rattle within three rides. The vibration works the fasteners loose progressively, and by the time the owner notices movement, the fiberglass around the holes has already started to spider.
The fix is not complicated: clean the inner pole wall completely, mix two-part epoxy correctly, coat the brace surfaces, insert, and let it cure fully before torquing anything. That one step is what separates a mount that lasts a full season from one that needs a rebuild after a few hours on the water. Professional shops treat it as non-negotiable, and so should any racer doing this job at home.
IPD Racing has the parts and guidance to get this done right
Skipping the research phase on a sub-pole install is where most DIY jobs go sideways. IPD Racing gives you the hardware and the knowledge to avoid that. The shop carries marine-grade sub-pole kits, 316 stainless fasteners, backing plates, and structural epoxy matched to common PWC platforms, so you are not sourcing mismatched parts from three different suppliers.
Every kit comes with installation documentation, and the tech team is available for fitment questions before you order. For riders who want a professional install, IPD Racing can connect you with experienced technicians who follow the same reinforcement and torque sequence outlined in this guide. Browse the Hot Products performance parts category for corrosion-resistant hardware and mounting components, or contact IPD Racing directly to confirm the right kit for your hull.
Sources
- IJSBA Freestyle 2025
- Repair and structural reinforcement of the handle pole of a jet water ski – MAZUREK; JOHN D.
- Does the Sea-Doo Spark Have a Ski Pylon? Complete Guide | Fission Review
- ski pylon? | Sea-Doo Forum
- Super Jet HD steering cable/UMI pole
- Stainless Steel 550 Handlebar Pole Crown

