

Freestyle Jet Ski Handpole Install: Step-by-Step Guide
A freestyle jet ski handpole install is the process of replacing or upgrading your stock handlepole to improve steering precision, rider stance, and overall freestyle performance on a stand-up personal watercraft. The handlepole is the single most rider-contact component on a freestyle ski, and swapping it for an aftermarket unit changes how the ski responds to every trick input. This guide covers the required tools, step-by-step installation, common troubleshooting issues, and a comparison of top models. Whether you are setting up a Kawasaki SX-R, a Yamaha SuperJet, or a similar stand-up platform, the process follows the same core principles.
What tools and materials do you need for a freestyle jet ski handpole install?
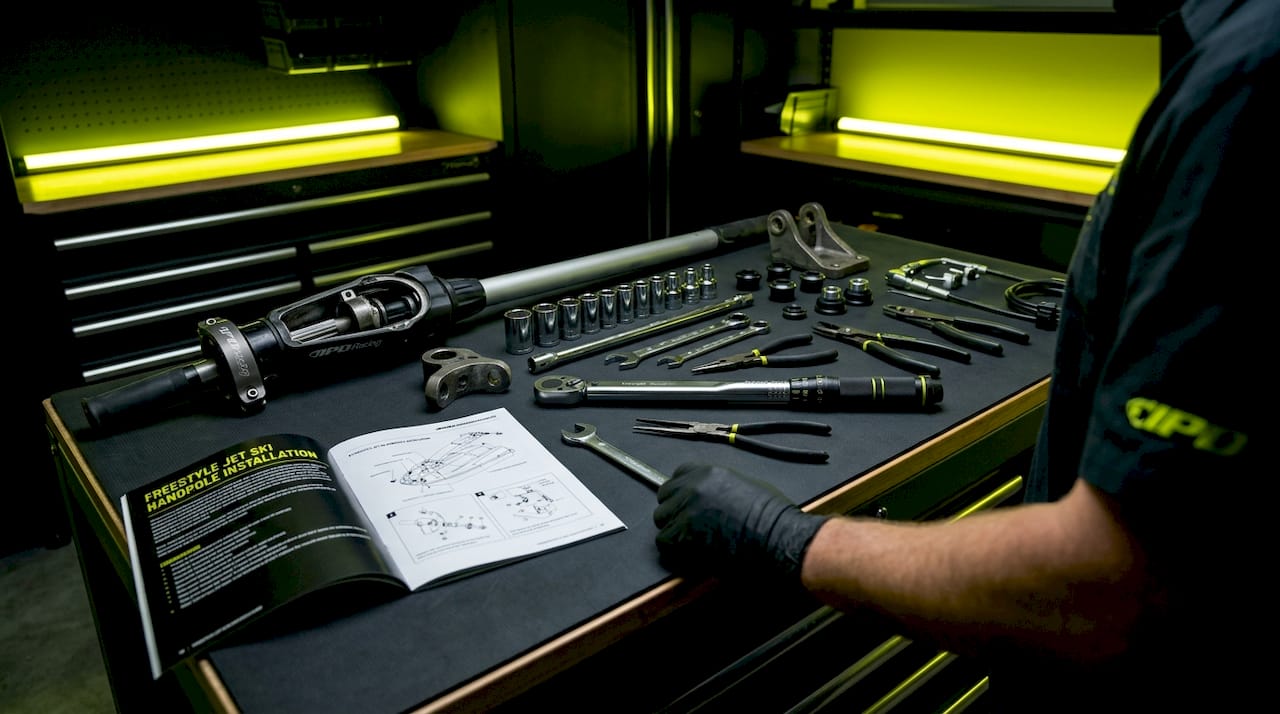
Gathering the right parts before you start saves time and prevents mid-job delays. A complete freestyle handpole setup includes more components than most riders expect on first glance.
Required handpole components:
- Handlepole tube (aftermarket or OEM replacement)
- Pivot bracket and mounting hardware
- Chin pad (protects the rider’s chin during aggressive riding)
- Grips and grip lock rings
- Steering cable and cable ball joints
- Steering bushings (upper and lower)
Required tools:
- Socket set and combination wrenches (10mm, 12mm, 14mm common)
- Phillips and flathead screwdrivers
- Needle-nose pliers and snap ring pliers
- Marine-grade thread locker (Loctite 243 or equivalent)
- Waterproof grease or marine lubricant
- Torque wrench for final fastener tightening
Optional upgrades worth considering:
Plug-and-play GPS speedometer modules can modernize older stand-up ski electronics during a handlepole overhaul without complex wiring. These modules cost about $129.99 as of May 2026 and work with traditional speed sensor setups, making them a practical add-on during teardown. Some GPS modules install fully plug-and-play via factory harness without needing separate power or diagnostic taps, which is a clean solution for Kawasaki platforms.
Pro Tip: Replace steering bushings and cable ball joints at the same time as the handpole. These components are difficult to access after the new pole is installed, and replacing worn bushings during installation prevents double labor down the road.
| Component | Purpose |
|---|---|
| Pivot bracket | Connects handlepole to hull and allows steering rotation |
| Chin pad | Protects rider during nose-down freestyle maneuvers |
| Steering bushings | Reduce play and maintain precise steering feel |
| Cable ball joints | Transfer steering input from pole to nozzle |
| Grip lock rings | Secure grips and prevent rotation under load |
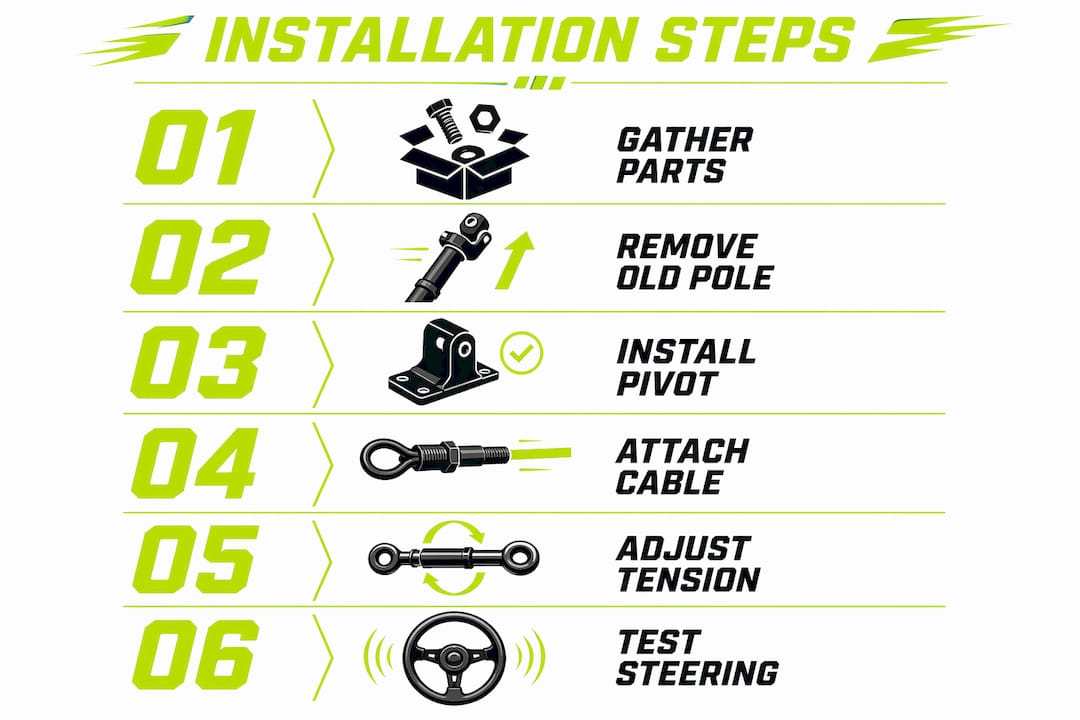
How do you perform a step-by-step handpole installation?
The installation process breaks into four distinct phases: removal, prep, assembly, and adjustment. Rushing any phase creates problems that show up on the water, not in the garage.
Phase 1: Remove the stock handlepole
- Place the ski on a stable stand with the hull supported at the tray.
- Disconnect the steering cable from the pole’s lower pivot point using snap ring pliers.
- Remove the pivot bracket bolts (typically four bolts through the hull deck).
- Lift the handlepole assembly straight up and out. Note the cable routing path before full removal.
- Inspect the steering cable, bushings, and ball joints for wear. Replace any worn parts now.
Phase 2: Prepare the new handlepole assembly
- Install grips onto the handlepole tube and secure with lock rings.
- Attach the chin pad to the lower section of the pole per the manufacturer’s spec.
- Thread the steering cable ball joint onto the new pole’s steering arm. Do not fully tighten yet.
- Apply waterproof grease to all bushing seats and pivot points.
Phase 3: Mount and align the new pole
- Lower the new handlepole assembly into the pivot bracket seat.
- Route the steering cable exactly as the stock cable ran. Incorrect routing causes binding.
- Install and hand-tighten the pivot bracket bolts.
- Confirm the pole sits centered over the hull centerline before torquing bolts to spec.
- Connect the steering cable ball joint and secure with the snap ring.
Phase 4: Adjust steering geometry and cable tension
Proper steering cable routing and tension adjustment are critical for optimal pole performance. Misalignment causes sluggish steering that directly impairs freestyle trick execution. Adjust cable tension so the pole returns to center with light resistance but does not feel stiff. Test full left and right lock before launching.
Pro Tip: The biggest mistake in handpole swaps is underestimating steering geometry complexity. Steering cable length, pole tension, and handlebar leverage all interact. Adjust one variable at a time and test on the water between adjustments.
- Check that the pole does not contact the hull at full steering lock.
- Verify the chin pad position clears your riding stance.
- Confirm all fasteners are torqued and thread locker is applied where specified.
What are the most common handpole installation problems?
Even experienced riders run into fitment and performance issues during a handpole swap. Knowing what to expect prevents frustration and protects your investment.
Steering cable routing errors are the most frequent problem. The cable must follow the original path through any guides or grommets in the hull. A misrouted cable binds under full lock, which creates dangerously heavy steering. Always photograph the stock cable routing before removal.
Fitment mismatches occur frequently with older ski platforms. Aftermarket freestyle handlepoles provide a lower, aggressive stance and reduce weight but often require custom fabrication or adapters on older skis. True plug-and-play setups are rare beyond modern stand-ups. If your pivot bracket bolt pattern does not match, you need a compatible adapter plate or a fabricated bracket. Most riders with pre-2010 platforms should budget for this possibility.
Worn steering bushings cause persistent play in the pole even after a new installation. Signs include lateral wobble at the pivot point and inconsistent steering return. Replace both upper and lower bushings if there is any detectable play. Proper servicing improves steering feel and extends the life of the entire steering assembly.
“Steering geometry is the linchpin of handpole performance, often more impactful than the pole model itself.” — X-H2o community expert
Heavy or sluggish steering after installation usually points to one of three causes: over-tensioned steering cable, insufficient lubrication at the pivot bushing, or a pole geometry mismatch where the steering arm length differs from the stock unit. Adjusting handlebar leverage relative to pole position is a subtle but important customization that determines how the ski flicks during freestyle maneuvers.
How do popular freestyle handpole models compare?
Choosing the right pole before you start the install saves significant time. The table below compares key specifications across common aftermarket options for stand-up freestyle platforms.
| Model | Weight | Compatibility | Installation Complexity | Included Components |
|---|---|---|---|---|
| Blowsion OVP System | Light alloy | Modern stand-ups, some adapters needed for older | Moderate | Pivot bracket, steering arm, grips |
| Rickter Freestyle Pole | Aluminum | Rickter-specific, limited crossover | Low (Rickter skis) | Full assembly with chin pad |
| Generic aftermarket tube | Varies | Wide, but often requires fabrication | High | Tube only, no hardware |
| OEM replacement | Stock weight | Direct fit for model year | Low | Full OEM assembly |
Aftermarket poles consistently outperform OEM units in freestyle applications because they are designed for lower rider stance and reduced rotational inertia. Most riders favor aftermarket poles for performance but need to confirm compatibility, sometimes fabricating adapters for older models to fit the pivot bracket properly. This customization requires moderate technical skill and should not be underestimated.
Pro Tip: Before purchasing any aftermarket pole, confirm the steering arm length matches your existing cable travel. A longer steering arm increases leverage but requires a longer cable or a cable adjuster. Mismatched arm length is the leading cause of post-install steering complaints.
OEM components offer the simplest installation path but sacrifice the performance geometry that makes freestyle riding more precise. For riders focused on competition or advanced trick riding, the added complexity of an aftermarket setup is worth the effort. Ipdracing stocks handpole tube wrap sets and compatible accessories that simplify the selection process for common stand-up platforms.
Key takeaways
A successful freestyle jet ski handpole install depends on correct steering geometry, proper component selection, and servicing bushings and cable joints during the same job.
| Point | Details |
|---|---|
| Prepare all components first | Gather pivot bracket, grips, chin pad, bushings, and cable joints before starting removal. |
| Service bushings during install | Replace steering bushings and ball joints now to avoid disassembling the pole again later. |
| Steering geometry drives performance | Cable tension, pole tension, and handlebar leverage must be calibrated together for freestyle control. |
| Confirm fitment before buying | Older ski platforms often need adapters or custom fabrication for aftermarket poles. |
| Test on water before riding hard | Verify full steering lock clearance and cable tension with a slow-speed water test before aggressive riding. |
Why steering geometry matters more than the pole you pick
I have watched riders spend significant money on premium aftermarket poles and then complain that their ski feels worse than stock. Almost every time, the issue is not the pole. It is the geometry setup. The pole is just a tube. What actually determines how a ski responds is the relationship between cable tension, steering arm length, and pivot bracket position. Get those three variables wrong and no pole on the market will fix the feel.
The other thing I see consistently is riders skipping bushing replacement because they want to save time. That decision almost always costs more time in the end. Accessing the lower steering bushing after a new pole is installed is genuinely difficult on most platforms. Spending 20 extra minutes replacing a $15 bushing during the install is one of the highest-return maintenance decisions you can make.
My honest advice: treat the handpole install as a full steering system service, not just a parts swap. Clean every pivot point, replace every wear item, and set the geometry from scratch. Riders who approach it that way consistently report better results than those who bolt on a new pole and expect it to transform the ski without any tuning.
— Casey
Get the right parts for your freestyle build from Ipdracing
Ipdracing supplies performance-focused PWC riders with the parts needed to complete a proper freestyle handpole setup, from tube wrap sets to full steering assemblies.
Ipdracing carries handle pole tube wrap sets designed for stand-up freestyle applications, along with grips, chin pads, and steering hardware for common platforms. The shop covers everything from recreation builds to full competition setups, so you can source compatible parts in one place. Browse the full Ipdracing shop to find handpole kits, steering components, and jet ski performance upgrades matched to your specific ski model.
FAQ
What is a freestyle jet ski handpole?
A freestyle jet ski handpole is the steering and control assembly on a stand-up personal watercraft, consisting of the handlepole tube, pivot bracket, grips, chin pad, and steering cable connection. Aftermarket versions are designed for a lower, more aggressive rider stance suited to freestyle trick riding.
How long does a handpole install take?
A straightforward handpole installation on a modern stand-up ski takes two to four hours, including steering geometry adjustment. Older platforms requiring adapter fabrication or full steering system service can extend the job to a full day.
Do I need special tools for installing a handpole?
Standard socket sets, wrenches, snap ring pliers, and a torque wrench cover most installations. Marine-grade thread locker and waterproof grease are also required for a durable, corrosion-resistant result.
Why does my steering feel heavy after installing a new handpole?
Heavy steering after a handpole install typically results from over-tensioned steering cable, insufficient pivot bushing lubrication, or a steering arm length mismatch. Calibrating pole tension carefully and verifying arm geometry resolves most cases.
Can I install a freestyle handpole on an older ski model?
Most older stand-up ski platforms require adapters or custom fabrication to fit modern aftermarket handpoles. Confirm pivot bracket bolt pattern compatibility and steering cable travel before purchasing any aftermarket pole for a pre-2010 ski.

